
Step-by-Step Guide to Deploying a Token Contract on Lisk with Hardhat and Viem


Table of contents
As the Lisk Blockchain announced a strategic move to integrate with the Ethereum eco-system as a Layer 2 Blockchain, in this article we will checkout how to deploy smart contracts to Lisk's sepolia testnet.
Requirements
To follow this guide you'll need,
VSCode a code-editor
Hardhat Runtime Environment for smart contract development.
Chai Testing Library for testing the smart contract
Metamask Wallet
Development
In your terminal, create a new directory using
mkdir <project-name>and open the folder in your favorite code editor.Then initialize a NodeJS project using the command
npm init -yFinally create a boilerplate Hardhat project with
npx hardhat init. This will trigger a CLI configuration setup. For this project, we are using TypeScript and Hardhat-Viem configurations.Once you have set up your Hardhat project, create a
MyToken.solfile and add the following code:
// SPDX-License-Identifier: MIT
pragma solidity >=0.7.0 <0.9.0;

import {ERC20} from "@openzeppelin/contracts/token/ERC20/ERC20.sol";
import {AccessControl} from "@openzeppelin/contracts/access/AccessControl.sol";
import {ERC20Burnable} from "@openzeppelin/contracts/token/ERC20/extensions/ERC20Burnable.sol";
import {ERC20Votes} from "@openzeppelin/contracts/token/ERC20/extensions/ERC20Votes.sol";
import {ERC20Permit, Nonces} from "@openzeppelin/contracts/token/ERC20/extensions/ERC20Permit.sol";

contract MyToken is
    ERC20,
    AccessControl,
    ERC20Burnable,
    ERC20Permit,
    ERC20Votes
{
    bytes32 public constant MINTER_ROLE = keccak256("MINTER_ROLE");

    constructor() ERC20("MyToken", "MTK") ERC20Permit("MyToken") {
        _mint(msg.sender, 10 * 10 ** decimals());
        _grantRole(MINTER_ROLE, msg.sender);
    }

    function mint(address to, uint256 amount) public onlyRole(MINTER_ROLE) {
        _mint(to, amount);
    }

    function grantMinterRole(
        bytes32 _role,
        address _account
    ) public onlyRole(MINTER_ROLE) {
        _grantRole(_role, _account);
    }

    function getTokenBalanceAtBlock(
        address account,
        uint256 targetBlockNumber
    ) public view returns (uint256) {
        return getPastVotes(account, targetBlockNumber);
    }

    // The following functions are overrides required by Solidity.

    function _update(
        address from,
        address to,
        uint256 value
    ) internal override(ERC20, ERC20Votes) {
        super._update(from, to, value);
    }

    function nonces(
        address owner
    ) public view override(ERC20Permit, Nonces) returns (uint256) {
        return super.nonces(owner);
    }
}
We used smart contracts from OpenZeppelin, which you can install by using
npm install @openzeppelin/contracts.Now we should test 🧪 the contract to verify the expected outputs, you can jump over to the Testing the Smart contract

Testing
In the tests folder create a
MyToken.test.tsfile and add the following:import { expect } from "chai"; import { viem } from "hardhat"; import { loadFixture } from "@nomicfoundation/hardhat-network-helpers"; import { toHex, hexToString, fromHex, parseEther } from "viem"; async function fixture() { const publicClient = await viem.getPublicClient(); const [deployer, account1, account2] = await viem.getWalletClients(); const myTokenContract = await viem.deployContract("MyToken", []); return { publicClient, deployer, account1, account2, myTokenContract, }; } const expectedDeployerTokenAmount = 10000000000000000000n; describe("MyToken Contract", async () => { describe("When the MyToken Contract is Deployed", async () => { it("defines a contract with the MyToken name", async () => { const { myTokenContract } = await loadFixture(fixture); const tokenName = await myTokenContract.read.name(); expect(tokenName).to.be.equal("MyToken"); }); it("gets the correct balanceOf Deployer", async () => { const { myTokenContract, deployer } = await loadFixture(fixture); const deployerBalance = await myTokenContract.read.balanceOf([ deployer.account.address, ]); expect(deployerBalance).to.be.equal(expectedDeployerTokenAmount); }); }); });Install Chai testing library using
npm i chai. To test the contract we can runnpx hardhat testNow give yourself a pat on the back, if you made it this far cause its time for deployment

Deployment
To deploy the contract we still need to :
Install dependencies such as dotenv -
npm i dotenvConfigure our
.envfile with our Alchemy API Key and Metamask private key . check out.env.exampleAfter configuring that we can create our
DeployMyToken.tsin ourscriptsfolder, with the following:
import { formatEther } from "viem";
import { abi, bytecode } from "../artifacts/contracts/MyToken.sol/MyToken.json";
import { createClients } from "./helpers";

async function main() {
  const { deployer, publicClient } = createClients();

  // print the last block number
  const blockNumber = await publicClient.getBlockNumber();
  console.log("Last block number:", blockNumber);

  // print the deployer balance
  const balance = await publicClient.getBalance({
    address: deployer.account.address,
  });
  console.log(
    "Deployer balance:",
    formatEther(balance),
    deployer.chain.nativeCurrency.symbol
  );

  //  use viem's deploycontract function to deploy
  console.log("\nDeploying MyToken contract");
  const hash = await deployer.deployContract({
    abi: abi,
    bytecode: bytecode as `0x${string}`,
  });

  // Get Contract Hash
  console.log("\nTransaction hash:", hash);
  console.log("Waiting for confirmations...");

  // Get Contract Address
  const txReceipt = await publicClient.waitForTransactionReceipt({ hash });
  console.log("\nMyToken contract deployed to:", txReceipt.contractAddress);
}

main().catch((error) => {
  console.error(error);
  process.exitCode = 1;
});
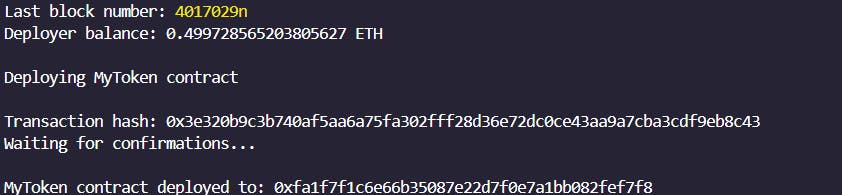
- To deploy the contract we can run
npx hardhat run scripts/DeployMyToken.ts. You will get an output like:
We can view the deployed contract here using the Lisk Sepolia Testnet Explorer. Here is the source code
Congratulations! 🎇 You've just deployed your smart contract on Lisk, now you should test the token contract by minting tokens, granting minter roles. I'll cover that on another article 😊 Until next time.
